Mood Bot - a Serverless Slack Integration
May 4, 2017
**Pull me on GitHub!**
Mood Bot
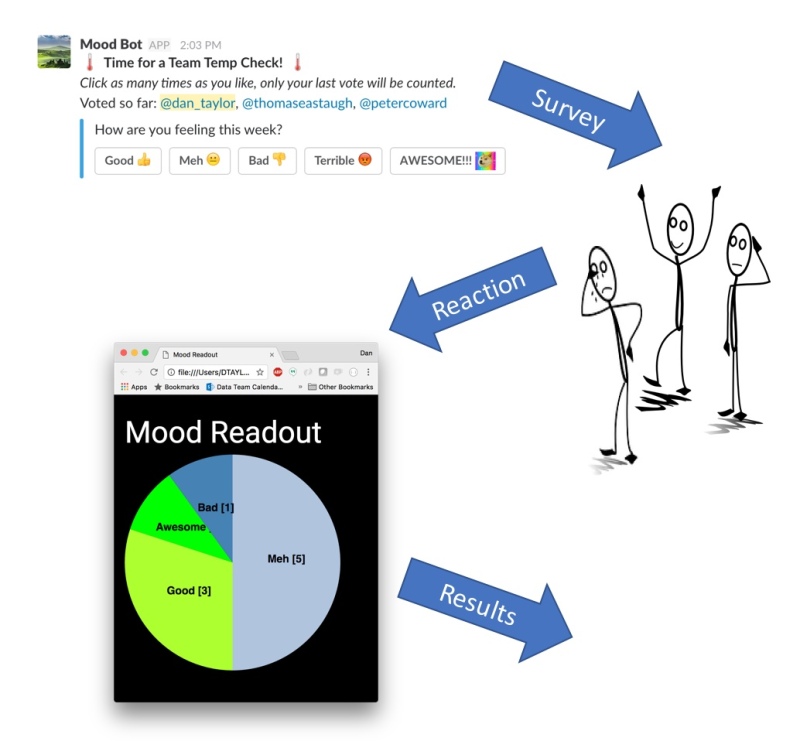
So it’s been a tradition in my office to use Slack to gauge the team’s mood once a week. Previously our PM would post a message asking for feedback and people would add a reaction to show how they were feeling. This worked fine, though there were a couple of issues: firstly it was pretty hard to interpret the weird collection of party parrots and doges, and secondly people tend to follow the herd when they can see how others have reacted.
Here’s my idea for the new, automated workflow…
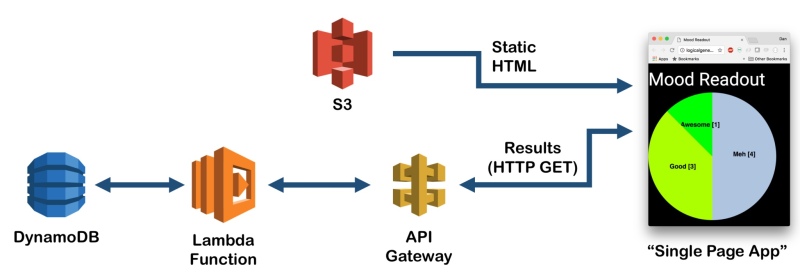
By far the cheapest and maybe the simplest way to host all of the code to do this is to “go serverless” using many of the cool features available on AWS to host code, databases and APIs on a pay-per-use basis. Here’t the technical architecture…
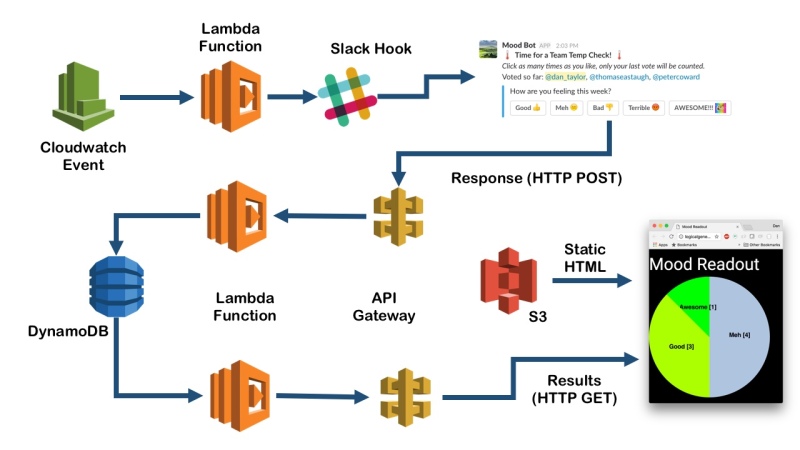
Based on the above there are three broad areas for development: send the webhook to Slack; deal with responses when users click the buttons and serve up a chart showing the results for the week.
Sending the Web Hook

Slack allows you to post Interactive Messages using an Incoming Webhook. In order to do this you’ll need to add a new slack bot integration using their very friendly web UI. I called mine “MoodBot”. Once you have a bot set up, you need to enable “Incoming Webhooks” and add the target URL to an environment variable (see here for more details).
The format of the message you send needs to be something like the following. Note that the “interactive” part of the message is included as an attachment.
const message = {
  "text": ":thermometer: @channel *Time for a Team Temp Check!* @channel :thermometer: \n _Click as many times as you like, only your last vote will be counted._",
  "channel": "@laurence.hubbard",
  "attachments": [
    {
      "text": "How are you feeling this week?",
      "fallback": "I am unable to understand your feelings. Too deep maybe?",
      "callback_id": "mood_survey",
      "color": "#3AA3E3",
      "actions": [
        {
          "name": "mood",
          "text": "Good :+1:",
          "type": "button",
          "value": "good"
        },
        {
          "name": "mood",
          "text": "Meh :neutral_face:",
          "type": "button",
          "value": "meh"
        },
        {
          "name": "mood",
          "text": "Bad :-1:",
          "type": "button",
          "value": "bad"
        },
        {
          "name": "mood",
          "text": "Terrible :rage:",
          "type": "button",
          "value": "terrible"
        },
        {
          "name": "mood",
          "text": "AWESOME!!!   :doge:",
          "type": "button",
          "value": "awesome"
        }
      ]
    }
  ]
}
This gives you a slack message looking like this:

The webhook is sent by a Lambda function, which is triggered crontab-style by a CloudWatch event rule. The Lambda looks like this:
const AWS = require('aws-sdk');
const url = require('url');
const https = require('https');
const kmsEncryptedHookUrl = process.env.kmsEncryptedHookUrl;
let hookUrl;
function postMessage(inputData, callback) {
const body = JSON.stringify(message);
const options = url.parse(hookUrl);
options.method = 'POST';
options.headers = {
'Content-Type': 'application/json',
'Content-Length': Buffer.byteLength(body),
};
const postReq = https.request(options, (res) => {
const chunks = [];
res.setEncoding('utf8');
res.on('data', (chunk) => chunks.push(chunk));
res.on('end', () => {
if (callback) {
callback({
body: chunks.join(''),
statusCode: res.statusCode,
statusMessage: res.statusMessage,
});
}
});
return res;
});
postReq.write(body);
postReq.end();
}
function processEvent(slackMessage, callback) {
slackMessage.channel = slackChannel;
postMessage(slackMessage, (response) => {
if (response.statusCode < 400) {
console.info('Message posted successfully');
callback(null);
} else if (response.statusCode < 500) { console.error(`Error posting message to Slack API: ${response.statusCode} - ${response.statusMessage}`); callback(null); // Don't retry because the error is due to a problem with the request } else { // Let Lambda retry callback(`Server error when processing message: ${response.statusCode} - ${response.statusMessage}`); } }); } exports.handler = (event, context, callback) => {
console.log("Sending a temp check request")
if (hookUrl) {
// Container reuse, simply process with the key in memory
processEvent(event, callback);
} else if (kmsEncryptedHookUrl && kmsEncryptedHookUrl !== '<kmsEncryptedHookUrl>') {
const encryptedBuf = new Buffer(kmsEncryptedHookUrl, 'base64');
const cipherText = { CiphertextBlob: encryptedBuf };
const kms = new AWS.KMS();
kms.decrypt(cipherText, (err, data) => {
if (err) {
console.log('Decrypt error:', err);
return callback(err);
}
hookUrl = `https://${data.Plaintext.toString('ascii')}`;
processEvent(event, callback);
});
} else {
callback('Hook URL has not been set.');
}
};
Setting up the rule to trigger the event is pretty simple. Log into the AWS console, select CloudWatch and choose Events -> Rules from the menu on the left. You can specify when the rule will run using a crontab line. I used…
**0 09 ? * WED ***
Which will run at 9am (GMT) every Wednesday. All this is set up via a reasonably clunky web interface!
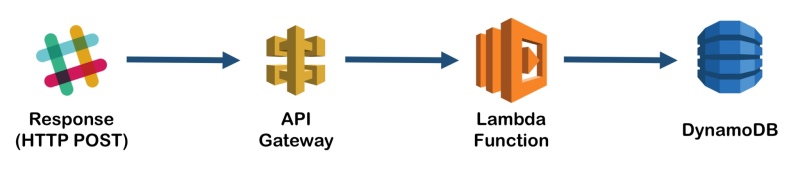
Collating Responses
This is the most complicated bit (and there’s an extra tricky bit to deal with too). To handle the responses when users click buttons on the interactive Slack message you need four things: 1. A lambda function to handle the POST request and push data to a database, 2. an API Gateway resource to provide an HTTP end-point, translate the request and forward it to the Lambda function, 3. a database to store the data and finally 4. a config setting in Slack to tell it where to send the POST.
Here’s the code for my Lambda function. It’s simple enough - it just takes the JSON in the incoming request, grabs the bits it wants and adds a few dates and times to create another JSON object to post to DynamoDB. The response sent back to slack is a replacement message, which will overwrite the one already in the channel. Here I add a list of users who have clicked so far (a better man would have pulled this list from the DB!).
var AWS = require('aws-sdk');

var dynamo = new AWS.DynamoDB.DocumentClient();
const table = "MoodResponses";

function updateVoters(original, voter) {
    var updated = original;

    var msg = "\nVoted so far: ";
    var comma = true;
    if(!updated.includes(msg)) {
        updated = updated + msg;
        comma = false;
    }

    if(!updated.includes(voter)) {
        if(comma) {
            updated = updated + ", ";
        }

        updated = updated + "<@" + voter + ">";
    }

    return updated;
}

Date.prototype.getWeek = function() {
        var onejan = new Date(this.getFullYear(), 0, 1);
        return Math.ceil((((this - onejan) / 86400000) + onejan.getDay() + 1) / 7);
    }

exports.handler = function(event, context, callback) {

    console.log('Received Slack Message: ', JSON.stringify(event, null, 2));

    var mood = event.actions[0].value;
    var date = new Date(Number(event.message_ts) * 1000);
    var key = event.user.id + "@" + date.getFullYear() + "-" + date.getWeek();
    var record = {
        TableName: table,
        Item: {
            key: key,
            message_ts: Number(event.message_ts),
            username: event.user.name,
            user_id: event.user.id,
            mood: mood,
            date_string: date.toISOString(),
            day: date.getDate(),
            month: (date.getMonth() + 1),
            week: date.getWeek(),
            year: date.getFullYear()
        }
    };

    console.log("Created mood record: " + JSON.stringify(record, null, 2));

    dynamo.put(record, function(err, data) {
        if (err) {
            console.error("Unable to add item. Error JSON:", JSON.stringify(err, null, 2));

            callback(null, {
                  text: "An error occurred inserting to DynamoDB. Error attached.",
                  attachments: [{text: JSON.stringify(err, null, 2)}],
                  replace_original: false
                });
        } else {
            console.log("Added item:", JSON.stringify(record, null, 2));

            callback(null, {
                  text: updateVoters(event.original_message.text, event.user.id),
                  attachments: event.original_message.attachments,
                  replace_original: true
                });
        }
    });
};
Setting up the API Gateway (The Extra Tricky Bit)
Setting up the API Gateway should be simple enough - you add a new API then a new resource then a new POST method. Then configure the method to forward requests to the Lambda function you just created. However, there are a couple of issues.
Firstly, you need to enable cross site access (CORS) which is easy enough - you just select “Enable CORS” from the “Actions” dropdown. This will open your method up to calls from other sites.
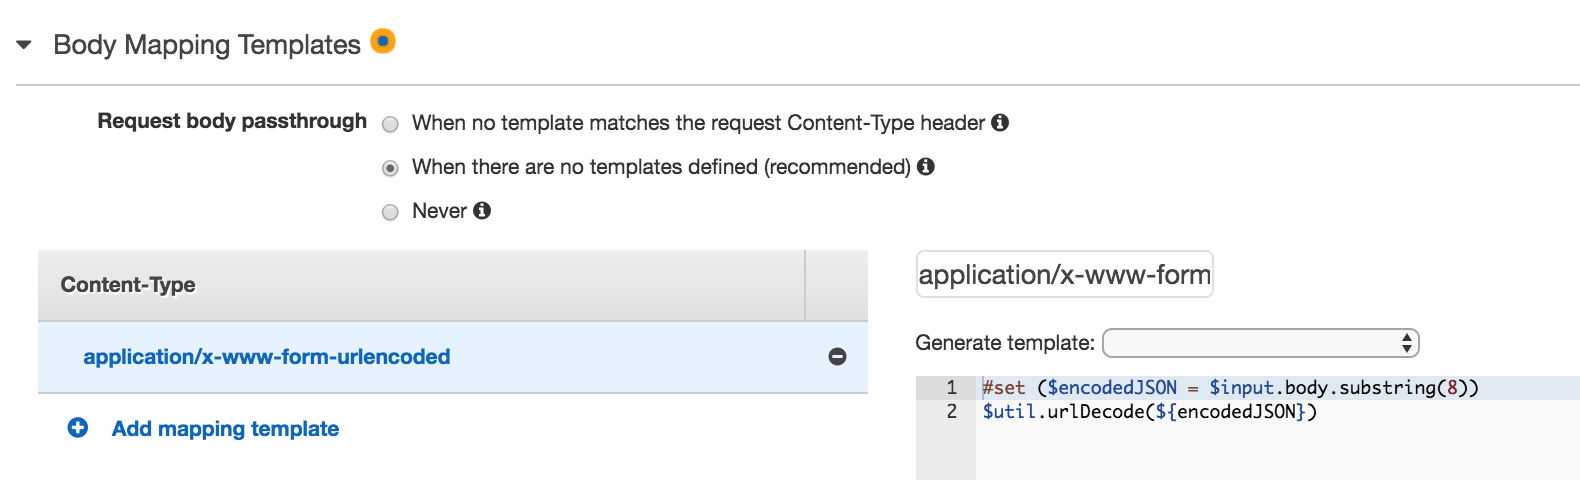
The second and far more infuriating issue is that Slack’s Interactive Buttons send the data in a funky way, encoding it weirdly in the message body rather than just posting JSON as all the other calls do. After a couple of days of intermittent head-scratching I finally found this Gist, which contains the code to fix the problem:
https://gist.github.com/willdages/dcac226b8d482b9dc105e6044a677345
This code needs to be placed into a Body Mapping Template for your POST method within the AWS API Gateway UI. The following screenshot hopefully give you enough of a clue on how to set this up. Now, when Slack sends the malformed (IMHO) POST, the API gateway will reformat it and pass it through to your lambda function as if it were a normal JSON payload.
Database Setup
I decided to use DynamoDB - Amazon’s “Document Database as a Service” (DDaaS?). I’m not sure it’s the perfect choice for this work, since querying is pretty limited, but it is very cheap and incredibly simple to use.
For this step, just use the web UI to create a new table called “MoodResponses”. I used an “id” field as the index. The lambda creates “id” by concatenating the user ID and current week. This means you automatically limit each user to a single vote per week, which is exactly the functionality I was looking for - more or less for free!
Slack Request URL
Final step is very simple - use the Slack admin UI for your bot to add the address of your API resource as the target for interactive message callbacks. Go to the admin page and select Features -> Interactive Messages from the panel on the left and paste in the URL of your API Gateway method.
Displaying Results
Though there are more boxes on the diagram below, this is actually the easiest step by far. We serve up a simple D3js “single page app” direct from S3 as static content. This SPA page calls a GET method on the REST service we created above which in turn calls a Lambda function. The Lambda hits out database, pulls out the results and sends them back as a JSON payload.
There’s not much more to explain, so I’ll just link to a Fiddle which includes the code for my front end - this one actually hits my production database, so you’ll be able to see how my team feel!
[jsfiddle url=“https://jsfiddle.net/DanteLore/u4dp0xb0/” height=“350px” include=“result,html,js,css” font-color=“39464E” menu-background-color=“FFFFFF” code-background-color=“f3f5f6” accent-color=“1C90F3”]
Serving this code up as a static HTML file is very easy: Create an index.html document and add the javascript, HTML and CSS from the fiddle; create a new S3 bucket and, in the properties for the bucket, enable “Static Website Hosting”; upload your index.html file to the bucket, select it and select “Make Public” from the “Actions” dropdown.
Here’s the code for the Lambda function which is servicing the GET request:
var AWS = require("aws-sdk");

var docClient = new AWS.DynamoDB.DocumentClient();

Array.prototype.countBy = function(key) {
  return this.reduce(function(rv, x) {
    rv[x[key]] = (rv[x[key]] || 0) + 1;
    return rv;
  }, {});
};

Date.prototype.getWeek = function() {
    var onejan = new Date(this.getFullYear(), 0, 1);
    return Math.ceil((((this - onejan) / 86400000) + onejan.getDay() + 1) / 7);
};

Date.prototype.previousWeek = function() {
    return new Date(this.getTime() - (7 * 24 * 60 * 60 * 1000));
};

function forWeek(week) {
    return {
        TableName : "MoodResponses",
        IndexName: 'week-user_id-index',
        KeyConditionExpression: "#wk = :week",
        ExpressionAttributeNames:{
            "#wk": "week"
        },
        ExpressionAttributeValues: {
            ":week":week
        }
    };
}

function handleError(err, callback) {
    console.error("Unable to query. Error:", JSON.stringify(err, null, 2));
    callback(null, {"error": JSON.stringify(err, null, 2)});
}

function handleData(data, callback, week) {
    console.log("Query succeeded.");

    var results = {
        week: week,
        moods: data.Items.countBy("mood")
    };

    callback(null, results);
}

function runFor(date, tries, callback) {
    var week = date.getWeek();
    console.log('Fetching mood results for week: ' + week);

    docClient.query(forWeek(week), function(err, data) {
        if (err) {
            handleError(err, callback);
        } else if(data.Items.length > 0 || tries <= 0) {
            handleData(data, callback, week);
        } else {
            runFor(date.previousWeek(), tries - 1, callback);
        }
    });
}

exports.handler = function(event, context, callback) {
    runFor(new Date(), 1, callback);
};
One Last Thing!
Dynamo can only query against fields which are part of an index. Here we need to query by week number, so I added a new index to my Dynamo table by week. This took 5 minutes to update (even though the table only had 5 records in it at the time!) but was simple enough to do. If you look at the code above, you can see where I specify the index in the query parameters.
Wrap Up
So this all works really well. There’s lots left to do: making the results look prettier and looking at how the sourcecode is deployed and managed being two things at the top of my list.
Slack is the industry standard tool for team collaboration these days, and bots and integrations amp up the power and productivity at your disposal. Build status, Jira tickets, team morale, coffee orders and whatever else you fancy can all be brought together with conversational APIs, simplifying just about everything.
On the AWS side, there’s still a lot of googling required to build this sort of thing, and sometimes information is scarce. Those who enjoy building “proper applications” using IDEs like IntelliJ or Visual Studio are going to find this frustrating - the pieces feel disjoint and uncontrolled sometimes. However, all in all it’s pretty cool what you can do without a single server in the mix.
It’s hard to deny that this development model is going to be the de-facto standard within the next couple of years, as it’s just so damned quick and simple. So get out and get serverless!