
Where there's a will there's a way!
In my last post I explained why you can’t put a 24v Series III starter motor into a 200TDi engine. In this post I am going to explain how, regardless of the impossibility factor, I did manage to put the 24v starter from a Series III into a 200TDi.
I’m quite pleased with the outcome as it does not stop me swapping back to a standard 12v motor if the need arises in future. No big changes were made to the new engine, just a small widening in the flywheel housing which makes no difference to the standard starter.
First job was to come up with a way to keep the motor central in it’s hole. The 24v motor has a slightly smaller diameter than the Discovery 12v version, so it needs something to help keep it centred. Using first the lathe, then a hand file and sand paper I made a very thin ring from an offcut of aluminium plate. I cut the ring to give it a tiny bit of expansion and glued it in place over the starter motor mounting flange as shown in the photo below.
 Thin aluminium ring round the 24v starter to help keep it central while bolting it up.
This was probably not the best way to get this done. Wrapping with copper foil or something similar would probably have done the trick. The ring doesn’t have much in the way of strength as it’s only about 1.5mm wide. It does keep the starter in place while the bolts are done up, after which time the bolts will hold it in place.
Thin aluminium ring round the 24v starter to help keep it central while bolting it up.
This was probably not the best way to get this done. Wrapping with copper foil or something similar would probably have done the trick. The ring doesn’t have much in the way of strength as it’s only about 1.5mm wide. It does keep the starter in place while the bolts are done up, after which time the bolts will hold it in place.
Another problem to deal with was that the holes in the mounting flange are closer together on the 24v starter than on the 12v version. I solved this problem by making some simple brackets which hold the motor very firmly and have studs to stop it spinning too.
 Mounting bracket using 200TDi stud to hold the 24v starter flange.
Making these brackets was made much easier by the discovery of a massive milling attachment in a box of Tom’s assorted tools. Not only did this cut through the steel plate like a knife through butter, it also left a mirror shine on the metal when it was done. I like it!
Mounting bracket using 200TDi stud to hold the 24v starter flange.
Making these brackets was made much easier by the discovery of a massive milling attachment in a box of Tom’s assorted tools. Not only did this cut through the steel plate like a knife through butter, it also left a mirror shine on the metal when it was done. I like it!
 Mounting brackets and spacers. Tapped an M10 hole through, screwed in a short length of studding and then punched the ends to provide a secure stud to mate with the starter’s mounting holes. Spacers were milled to ~0.25mm smaller than starter’s mounting flange.
The brackets are made from thick steel so should hold the motor very firmly indeed for years to come. I test fitted the flywheel housing and starter with new fittings to the engine and it fit perfectly. There’s a very slim chance the longer motor body would interfere with a standard exhaust downpipe but I intend to make a custom one, so should be OK.
Mounting brackets and spacers. Tapped an M10 hole through, screwed in a short length of studding and then punched the ends to provide a secure stud to mate with the starter’s mounting holes. Spacers were milled to ~0.25mm smaller than starter’s mounting flange.
The brackets are made from thick steel so should hold the motor very firmly indeed for years to come. I test fitted the flywheel housing and starter with new fittings to the engine and it fit perfectly. There’s a very slim chance the longer motor body would interfere with a standard exhaust downpipe but I intend to make a custom one, so should be OK.
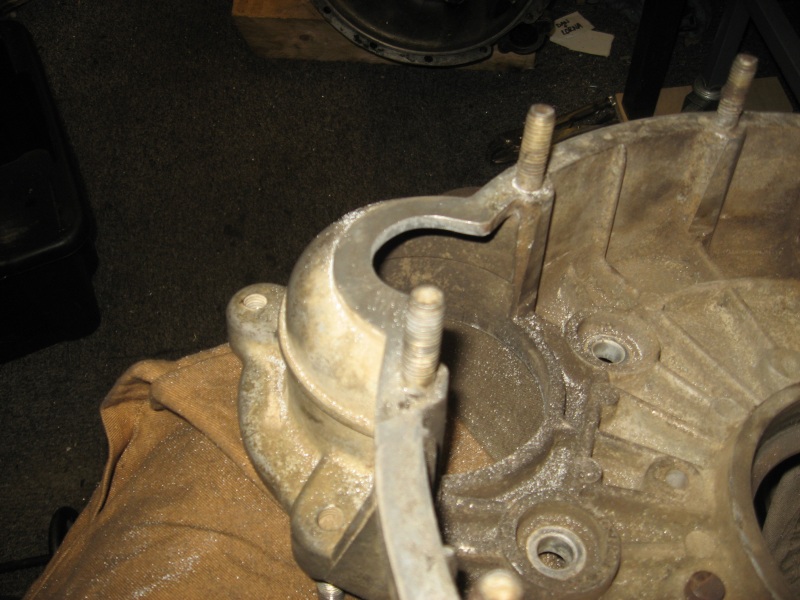 Enlarged the gap in the flywheel housing using a hand file. Roughly 5mm of material removed all round.
A small modification to the flywheel housing lets the beefy starter shaft and gear pass through with room to spare. Obviously there’s bags of room in the Series III bell housing for the older starter motor shaft.
Enlarged the gap in the flywheel housing using a hand file. Roughly 5mm of material removed all round.
A small modification to the flywheel housing lets the beefy starter shaft and gear pass through with room to spare. Obviously there’s bags of room in the Series III bell housing for the older starter motor shaft.
 Mounted to engine. Starter gear disengaged.
 As above but with the starter gear engaged.
I was worried that the starter engages from the back rather than the front, but this works fine. The Series III flywheel has no tapering on the teeth and relies on the starter gear’s tapers for a smooth engagement, so there should be no issues with the TDi flywheel’s untapered teeth.
As above but with the starter gear engaged.
I was worried that the starter engages from the back rather than the front, but this works fine. The Series III flywheel has no tapering on the teeth and relies on the starter gear’s tapers for a smooth engagement, so there should be no issues with the TDi flywheel’s untapered teeth.
Tested it by hand on the 200TDi and it works like a charm. Not tried it under power yet, but I see no reason why it wouldn’t work. Fingers crossed!
So, 24v starter now ticked off the list of engine conversion worries. Next job is to fabricate a mounting for the massive 24v generator (something the military decided was impossible on the 200TDi engine). After that I just have to worry about powering the glowplugs; all the other engine electrics will be fed at 12v off a low power voltage dropper already installed in The Duke’s dashboard.